CuteFTP, like WS_FTP, is a very popular Windows-based FTP client that you can use to upload and download files to and from your account here at Mr.Host. Many users use this client on a daily basis in order to manage their web content, and it has proven to be a very valuable tool for many.
If you would like to get a copy of CuteFTP, you can visit the official website here:
Connecting
First, start CuteFTP by double-clicking on it from the Windows Explorer. You may be prompted by a window entitled ‘CuteFTP Connection Wizard’; If so, simply click on the cancel button in order to get into the program.
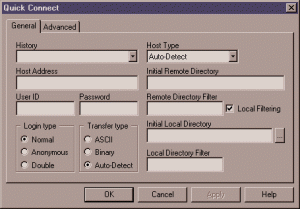
On the toolbar, you will see a small icon that looks like a lightning bolt. To connect, click on this button. A dialog box will appear that prompts you to enter the necessary information used to connect to your server.
In the field labeled ‘host address’, type in the domain name of your web site. Usually this is in the form ‘mydomain.com’ or, you can always specify ‘ftp.mrhost.ca’.
Next, type in your name and password in the ‘User ID’ and ‘Password’ fields, respectively. Remember to type them in with the correct combination of upper and lower case letters, and the fields are case sensitive.
Make sure that under the Login Type heading, ‘Normal’ is selected. Also, under the transfer type setting, you should ensure that the ‘Auto-Detect’ radio button is chosen. Host type should also be set to ‘Auto-Detect’.
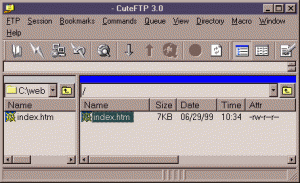
Click the ‘OK’ button. This will initiate a connection to the server. Once connected, you will be presented with a directory listing of your hard-drive (to the left) and the remote server (to the right).
To transfer files between your hard-drive and the server, simply drag the icon of the file from one listing to the other. You may need to navigate through your hard-drive or the remote server to find the directories and files you wish to work with. If you wish to select multiple items at the same time, hold down the control key as you click on each file or directory.
Remember that to show up at your domain, files for your site must be placed in the correct hosting directory, not in the root directory of your account. Generally, your site is stored in a directory with the same name as the domain it is hosted under.
Changing Permissions
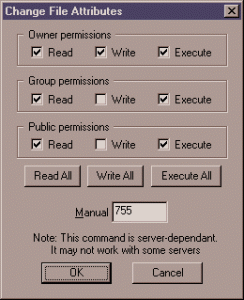
Some users may need to change the permissions of various files. Normally this would require the use of a telnet application, but some FTP clients (including CuteFTP) include this capability. To change the permissions of a file or directory, right-click on whichever file you wish to change and select the ‘Change file attributes’ function.
This will present you with the following window:
You can specify the read, write, and execute permissions for each user classification (owner, group, and public). This is analogous to the Unix ‘chmod’ command that you would use after using telnet to connect to your account.


