Mr.Host supports secure encrypted access to all it’s email services, including IMAP, POP3 and SMTP. We support both SSL and STARTTLS (sometimes simply called TLS).
STARTTLS support is enabled on the default ports- port 143 for IMAP, port 110 for POP3, and ports 25, 587, 2500 and 8080 for SMTP.
SSL is enabled on ports 993 for IMAP, 995 for POP3 and 465 for SMTP.
Mr.Host recommends using TLS for all SSL connections.
You’ll find below some quick notes on how to update the most common mail clients to use TLS.
Outlook 2010
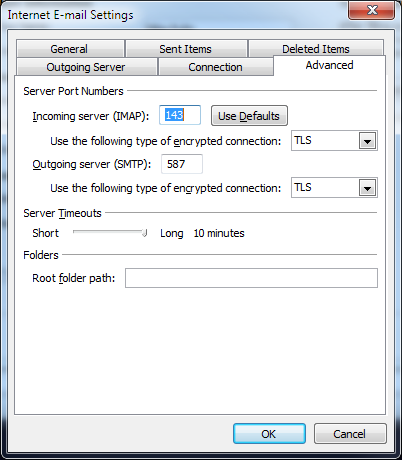
1) To go File -> Account Settings -> Select your Mr.Host e-mail account -> click Change.
2) Select More Settings -> Advanced Tab.
3) Under both the Incoming and Outgoing server options, select “TLS” in the drop down beside “Use the following type of encrypted connection. The Incoming server port should be 110 for POP3 or 143 for IMAP. The Outoing server port should be either 587, 2500 or 8080.
Mozilla Thunderbird
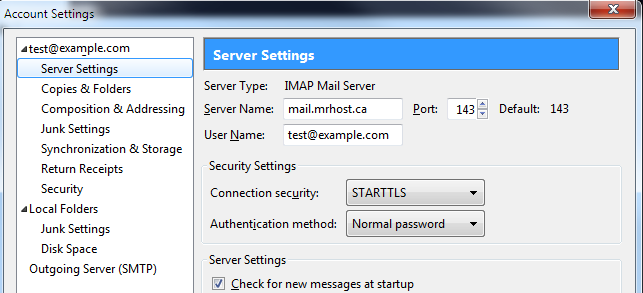
1) Go to Tools -> Account Settings …
2) Select your Mr.Host e-mail account from the left side menu. Select Server Settings, and under the Security Settings heading, change Connection Security to STARTTLS.
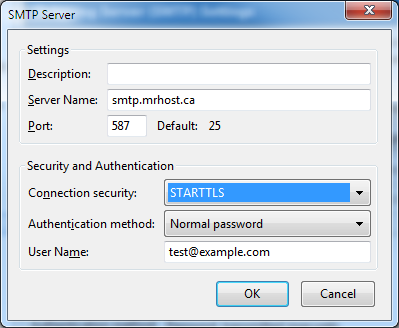
3) Select the Outgoing Server (SMTP) option at the bottom on the left, and select Edit…
4) Under the Security and Authentication section, change Connection security to STARTTLS.
Mac MAIL
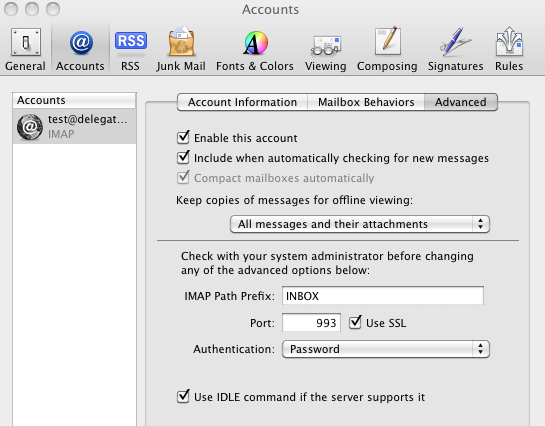
1) Select the Mail menu -> Preferences. Select the Accounts Tab
2) Select your Mr.Host account, and select the Advanced Tab. Check the “Use SSL” checkbox beside the Port option.
This should change the port to 995 for POP3 accounts, and 993 for IMAP accounts.
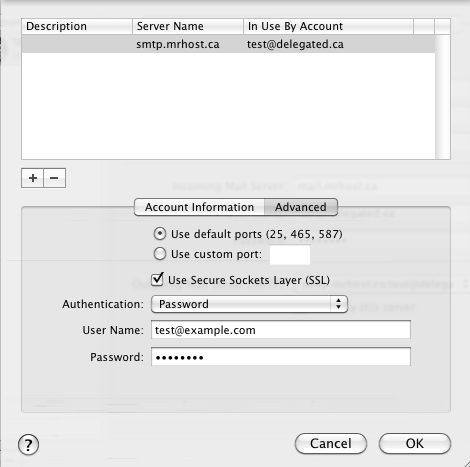
3) On the Account Information tab, click the Outgoing Mail Server (SMTP) drop down list, and select “Edit SMTP Server List”.
4) Select the Mr.Host SMTP server and select the Advanced tab. Check the box that says “Use Secure Sockets Layer (SSL)” and click OK.
IPhone 4/5, iPod
1) Open your Settings Icon, and select Mail, Contacts, Calendars.
2) Select your Mr.Host account from the Accounts section.
3) On the Account panel, select the SMTP server under the Outgoing Mail Server section at the bottom. Select the Primary Server, then set the Use SSL checkbox to ON.
4) Back on the Account panel, select Advanced at the very bottom, and under Incoming Setting set the Use SSL checkbox to ON.
