Mail is the e-mail client included with Mac OS X, Apple’s powerful Unix-based operating system.
Setting up Apple Mail to work with your Mr.Host is fairly simple. Simply launch the Mail application and follow the directions below. Please note that this document was written for Mail running on Mac OS X 10.2.8 – later versions may look slightly different, though the same settings should be used.
1. With Apple Mail running, select “Preferences…” from the Application menu.
2. A window should appear with the currently defined e-mail accounts set up to work with Mail. If this is not the case, click on the “Accounts” icon at the top of the window.
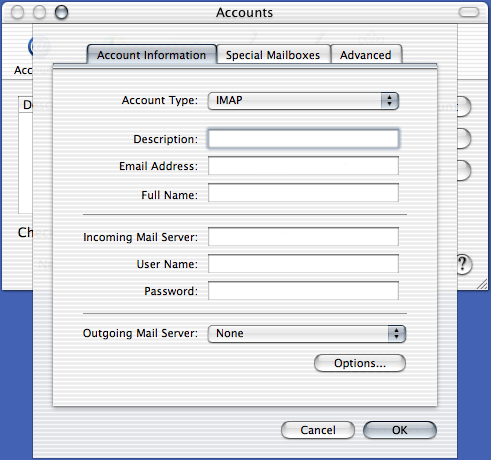
3. Click on the “Add Account” button. A sheet will appear from the top of the menu. This is where you will enter the main settings for your e-mail account.
4. Select “POP3” or “IMAP” from the Account Type select menu.
5. Type anything you want under Description. We recommend something short, easy to remember, and easily distinguishable from any other e-mail accounts you may have.
6. Type your full e-mail address into the Email Address field. This is the address people will reply to when they respond to a message from you.
7. Type in your name under Full Name. Technically, this can be anything that you want.
8. In the Incoming Mail Server field, type “mail.mrhost.ca”.
9. Type your FULL e-mail address in the User Name field.
10. Type your e-mail password into the Password field. Make sure to type it exactly as it is defined (ie. upper-case letters must actually be capitalized).
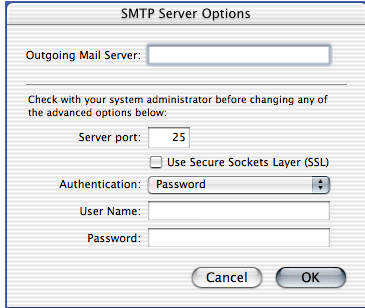
11. From the Outgoing Mail Server select list, choose “Add Server…”. A window will appear.
12. In the Outgoing Mail Server field, type “smtp.mrhost.ca”.
13. Select “Password” from the Authorization select list.
14. Type your FULL e-mail address in the User Name field.
15. Type your e-mail password into the Password field. Make sure to type it exactly as it is defined (ie. upper-case letters must actually be capitalized).
16. Click the “OK” button. You should be returned to the main account preferences window. You may either close this window, or change other Mail preferences here.
Your e-mail account should now be configured correctly, and you should be able to check your e-mail using Mail. If you run into any problems, have any questions, or can’t get it to work please don’t hesitate to contact Mr.Host customer support.

